Starting and accessing a Jupyter Notebook (Windows)
To run a Jupyter Notebook in the DTU databar while displaying it output in your browser requires three steps.
Starting the notebook on an interactive compute node.
Make a connection to the relevant compute node, bypassing the firewall.
Connecting your browser to the Jupyter Notebook process.
Logging into the databar
If you are not already logged into the databar, do so by starting
MobaXterm. There should be a session available from the welcome
screen of MobaXterm named login.gbar.dtu.dk or similar, created
when you logged in the first time. Click on it to log in again. Note
that when you are asked for a password, you should use your DTU
password, not the Jupyter password you just created!
Once you are logged in on the front-end, get a session on an interactive compute node by typing the command:
linuxsh -X
Starting a Jupyter Notebook
Change to the folder where you keep your notebooks (most likely CAMD2022) and start the Jupyter Notebook server:
cd CAMD2022
source venv/bin/activate
camdnotebook
The command camdnotebook is a local script. It checks that you
are on a compute server (and not on the front-end) and that X11
forwarding is enabled. Then it starts a jupyter notebook by running
the command jupyter notebook --no-browser --ip=$HOSTNAME
(you can also use this command yourself if you prefer).
The Notebook server replies by printing a few status lines, as seen here
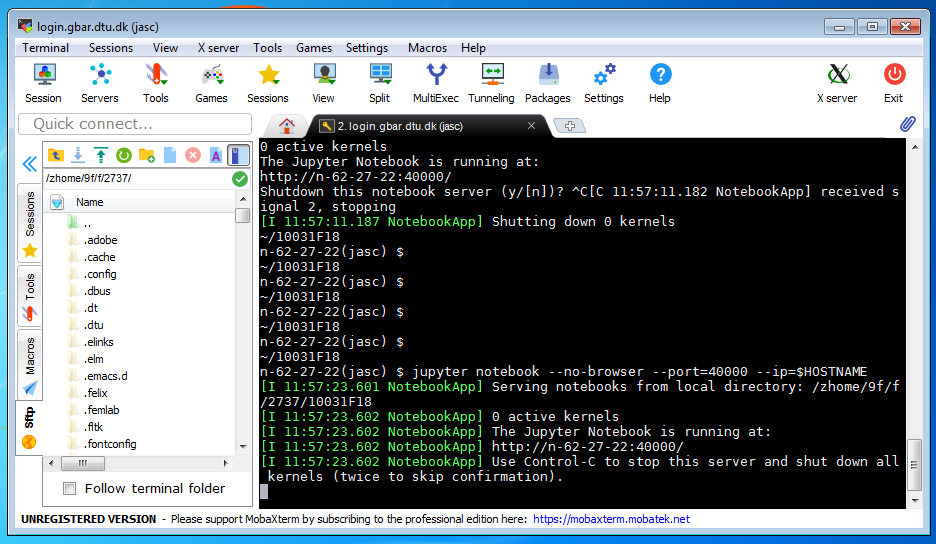
The important line is the second from the bottom, it shows on which
computer and port number the notebook is running (here n-62-27-22
and 40000, respectively).
Create an SSH Tunnel to the notebook
Use MobaXterm to create a so-called SSH Tunnel from your laptop (which cannot connect directly to the compute node) to the login server (which can).
In the top of your MobaXterm login window there is a row of buttons.
One of them is named Tunneling, press that button.. You now get a
new window called MobaSSHTunnel, in the lower left corner of the new
window you find a button called New SSH Tunnel, press it. A new
window opens, as shown here:
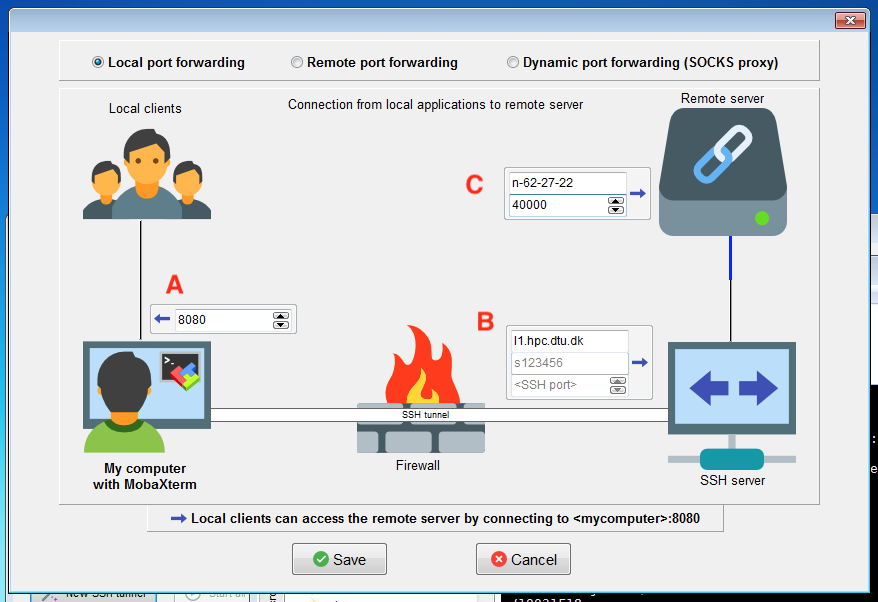
In the field marked with a red A on the figure you should write the port number 8080 (that will be the local port number on your laptop).
In the field marked B you should write the name of the
“stepping-stone” computer, in this case use login.gbar.dtu.dk (the
figure show l1.hpc.dtu.dk, that also works). You also need to
enter your user name (s123456 in the figure).
In the field marked C you write the name of the compute node, and the
port number of the Notebook server. The machine name will have the
form n-XX-YY-XX (where XX etc are numbers - if it is gbarlogin
you forgot to run the linuxsh command mentioned at the top of this
page!) The port number is typically 40000 or a number slightly above
or below.
Now press the button Save. You will now see a window like the one
shown here:

Check that the machine name and port number are correct, then start the tunnel by pressing the small “play” button (with a right-pointing triangle). If you are asked for a password, it is the DTU password, not the Jupyter password.
IMPORTANT: When you log out from the databar and log in again (fx on the following days of the summer school), you will get a new compute node. You will therefore need to start a new Jupyter Notebook server, and create a new SSH tunnel as described above. Then you have to be careful and start the right one.
Starting a browser.
Start a browser (Chrome and Firefox are known to work well) and write in the address bar:
http://localhost:8080
Your browser is now asking for your Jupyter password (the one you created when setting up your account). You are now ready to open one of the notebooks, and run the exercises.
Logging out
When you are done for the day, please
Save all notebooks, then select
Close and Halton the file menu.Stop the SSH tunnel.
Stop the Jupyter Notebook server by pressing Control-C twice in the window where it is running.
Log out of the databar by typing
exittwice in the window(s).